Sync Notion & Google Calendar Through Time Blocking!
30-Day Money Back Guarantee • Easy to Use

Method 1: Embedding Google Calendar directly (2 min)
This is the most common method for embedding Google Calendar in Notion (and anywhere else, for that matter).
1. Open Google Calendar on your desktop.
Yes, it has to be your desktop. Doing this on mobile won’t work.
2. Open calendar settings.
On the left side, you will see a list of calendars. Click on the calendar you want to embed and click on the kebab icon 🍡 beside it.

3. Make the Calendar public.
Under “access permissions for events,” you’ll see an option called “make available to public.” Click on that box.

You’ll get a warning message saying that your calendar will now be accessible to the public. That even includes Google Search!
Without making the calendar public, you won’t be able to embed it! So if this is a deal-breaker for you, then move on to Method 2 or explore a Notion template that connects to Google and Outlook calendars through a free integration.
Click on “OK.” Now, your Google Calendar is ready to be added to Notion!
4. Grab the embed code.
Once you’ve made your calendar public, scroll down even further to the section called “Integrate calendar.” Here, you’ll find a section called “public URL to this calendar” along with a code snippet. Copy this code to your clipboard.

5. Create an embed block in Notion.
Open Notion and go to the page where you want your Google Calendar to be embedded.
Use the slash command “/embed” and select “Embed” from the list of options.

6. Paste the embed code.
After you’ve created the embed block, a box will pop up with a field for you to paste your Google Calendar link. Paste the link you’ve just copied in step 4 and click on “embed link.”

Voila! Your Google Calendar has now successfully been embedded in Notion!
You can resize it and use it as needed. No more switching between apps during your Monday meetings anymore.

Okay, great! But now, you may think – I have very sensitive information in my Google Calendar, and I do not want to make it public. Can I still embed Google Calendar in Notion?
Yes, you can! This brings us to the second method.
Method 2: Embed Google Calendar to Notion using Indify (5 min)
Indify is the Notion widgets app. It allows you to embed things like a life progress bar, weather forecast, and, yes, Google Calendar!
And the best part, of course, is that Google Calendar doesn’t have to be public to be embedded in Notion!
The free version of Indify allows you to embed only one calendar in Notion. If you want to add multiple calendars, you will need to upgrade to the pro version ($4 per month).
1. Create an account.
Open Indify on your desktop and sign up with your Google account.

2. Pick the “Google Calendar” widget from the list.
Once you’ve signed in successfully, you should be able to view several widgets including the Google Calendar widget.

Choose the “Google Calendar” widget and give it a name.

3. Sign in to your Google account.
You will arrive at the configuration page. Sign in to your Google account so that you can select the calendar you want to embed.

4. Select the calendar from your Google account.
Once you’ve logged in, you can select specific calendars in your Google account. Events from all of the selected calendars will show up in your embed block. You will be able to see the preview on the right side.
5. Customize the calendar appearance.
Indify allows you to change the way your calendar looks. You can switch to dark mode, set a custom background color, change text color, and so on.

6. Copy the embed code.
Once you’re done customizing the appearance, copy the link in the bottom left corner of the page.

7. Embed the calendar to Notion.
Like how we did in method 1, go to a Notion page, add the /embed block, and paste the embed link. And you’re all done!
Here is the final product:

💡️Pro Tip: Place the embed block into a sync block and use it across your Notion workspace. You can also add this sync block to a Notion database template.
Limitations of Embedding Google Calendar in Notion
Much like everything else in life, embedding Google Calendar in Notion doesn’t come without limitations. Depending on your goals, using the embed method can be good OR bad (explore all 4 ways here).
You cannot edit the calendar from Notion.
You can only view the calendar. If you need to add new events, you’ll have to go back to the Google Calendar app or website and add new events from there.
It may be a little frustrating to switch tabs because this is what you wanted to eliminate in the first place. But it can be a great option if you run a public calendar for a business like a yoga studio and want to share the event schedule inside your Notion one-page website.
Your Google Calendar must be public (when using the direct embed method).
This can pose a security threat to you or your company. Anybody will be able to do a Google search and find your public calendar. Yes, even your competitors and ex-girlfriend.
The best workaround I have found is to embed with Indify.
1990s design.
The embedded Google Calendar calendar block looks terrible. And there is no designer who can convince me otherwise. Crazy to think that this would be the case for a trillion-dollar company.
Of course, this may be a non-issue to many people out there. But hey! Some people like having pretty calendars to look at, okay?
Again, the solution to this is creating a widget using Indify because the website lets you customize your calendar! It’s slightly better but still feels a bit out-of-place compared to the Notion UI.
Instead of embedding your entire Google Calendar, you can just copy events from Google Calendar to Notion within a specific time frame instead.
And you don’t need to do this manually either. This automation will do the trick with just a few clicks.
Connect Google Calendar with Notion
As you can see, there are a lot of ways to integrate Google Calendar and Notion using Zapier. For the sake of this tutorial though, we’re going to focus on one of the workflows we mentioned above—adding Google Calendar events to a Notion database. But you can use these same steps to connect Google Calendar and Notion in tons of different ways.
Before you begin
Before you create a Zap that integrates Google Calendar with Notion, you’ll need to create a Zapier account if you don’t have one already. Don’t worry, creating an account is easy and free. You’ll also need a Google account and a Notion account.
Once you’re signed in, you can create new Zaps by clicking the Create Zap button or by going to zap.new.
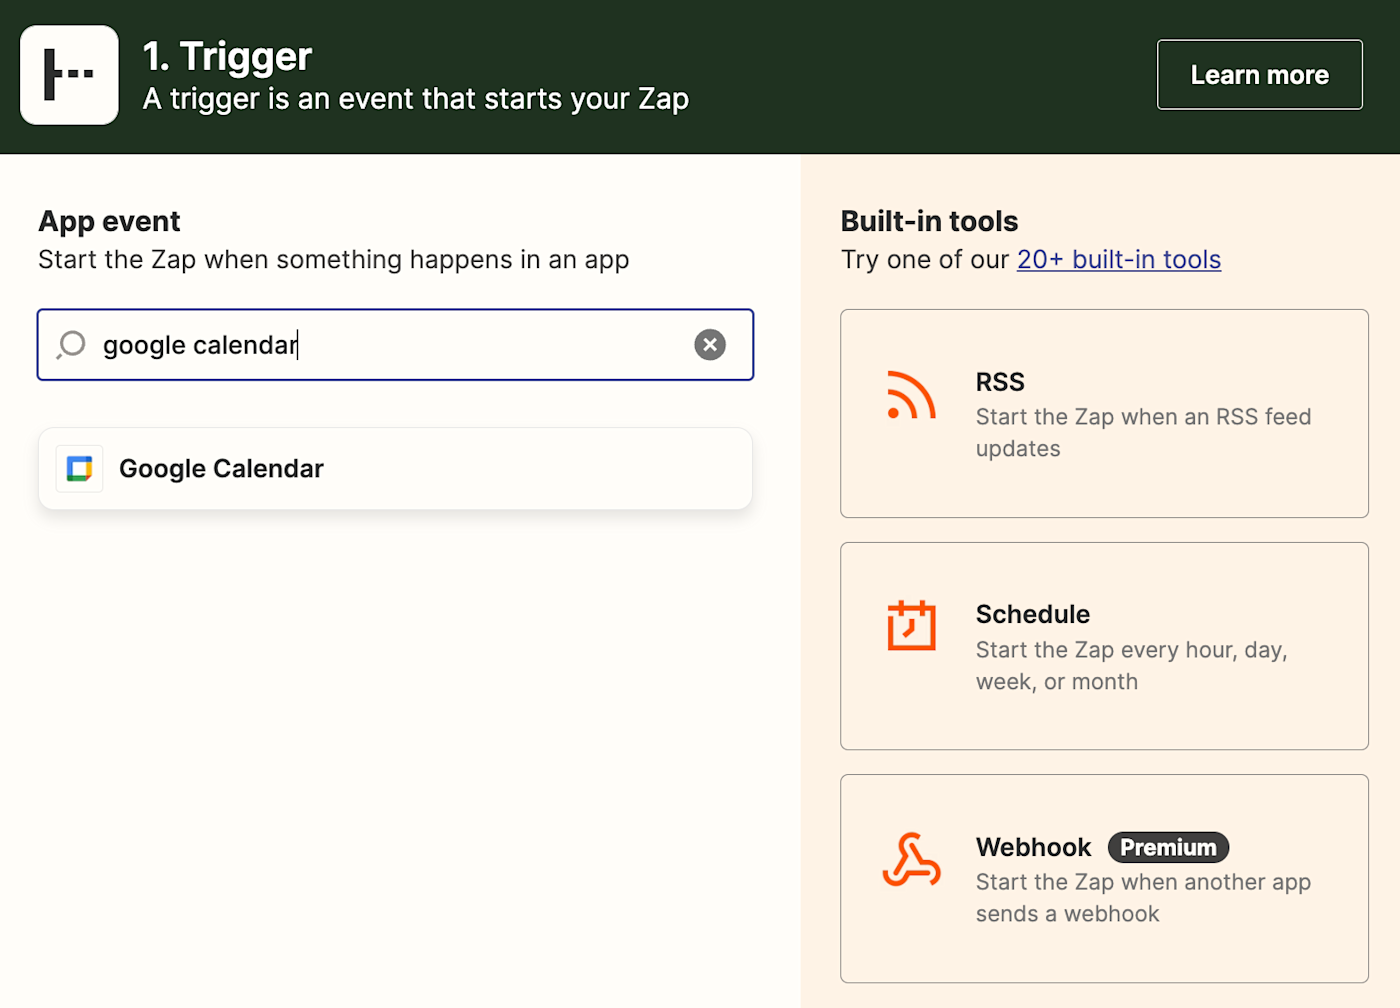
Step 1: Connect your trigger app
A Zap always consists of two parts:
-
- The trigger: an event that starts a Zap.
- The action: an event a Zap performs after it’s triggered. A single Zap can perform more than one action.
Depending on the workflow you’re setting up, your trigger app could be Google Calendar or Notion.
Search for and select your trigger app. In our example, we’ll select Google Calendar for our trigger app.
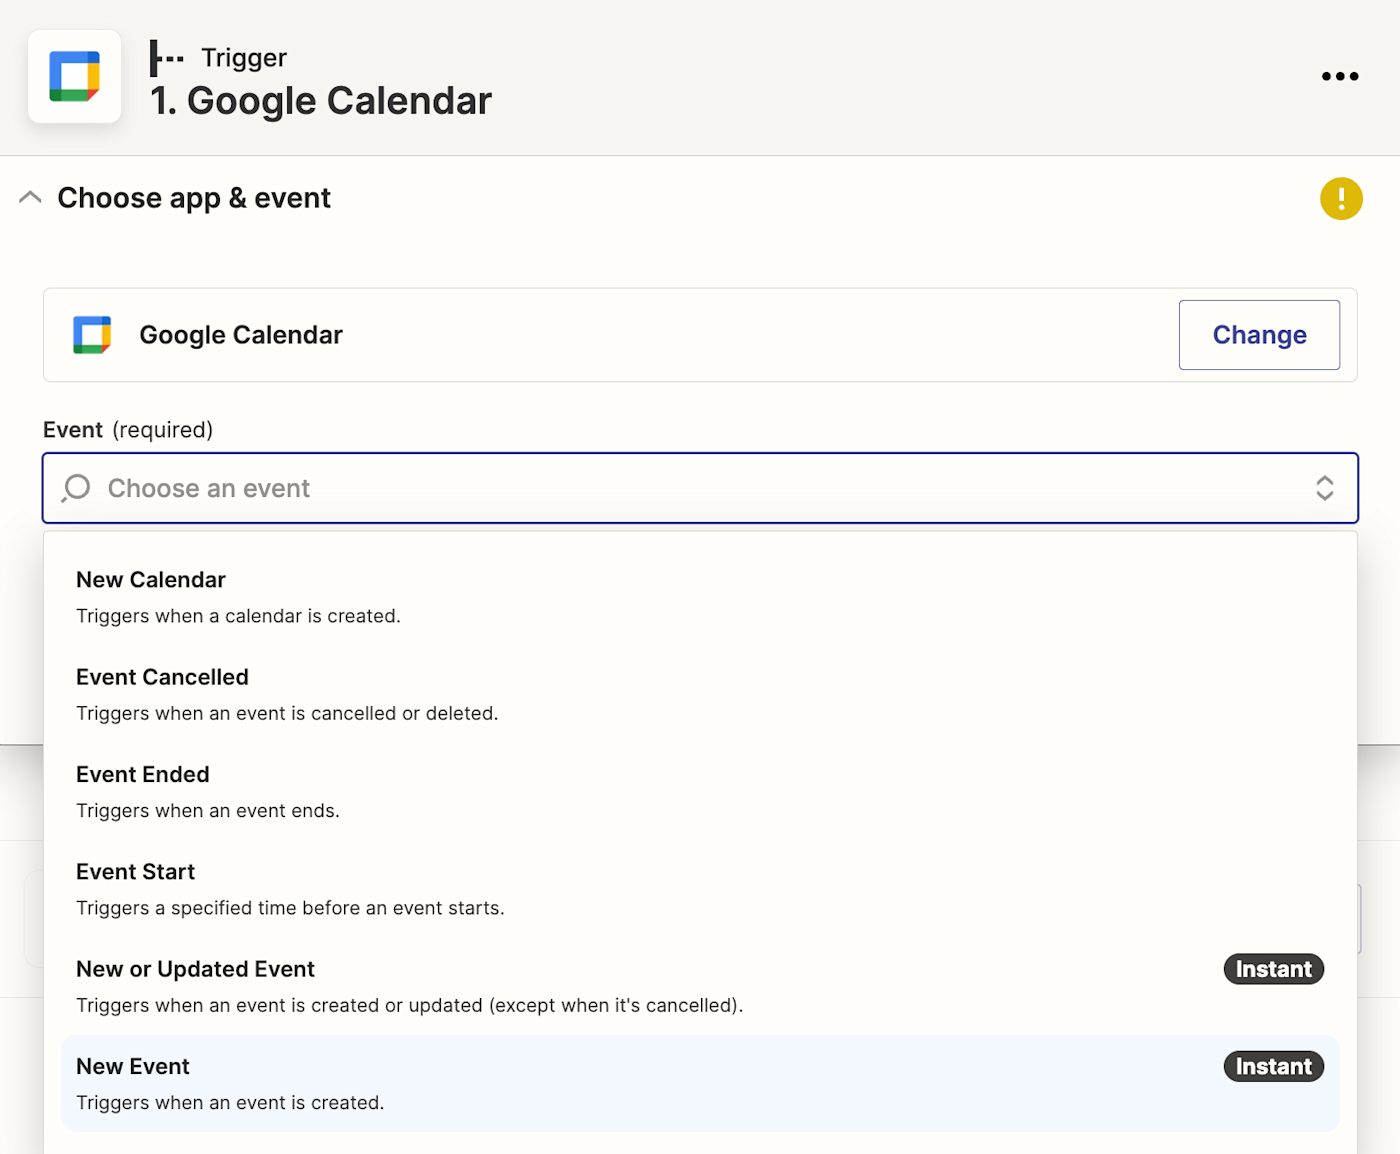
Then select your trigger event. If your trigger app is Google Calendar, your Zap can trigger when you create a new calendar or event, an event starts or ends, and more.
If your trigger app is Gmail, your Zap can trigger when you receive a new email, an email with a particular label, an email with an attachment, and more.
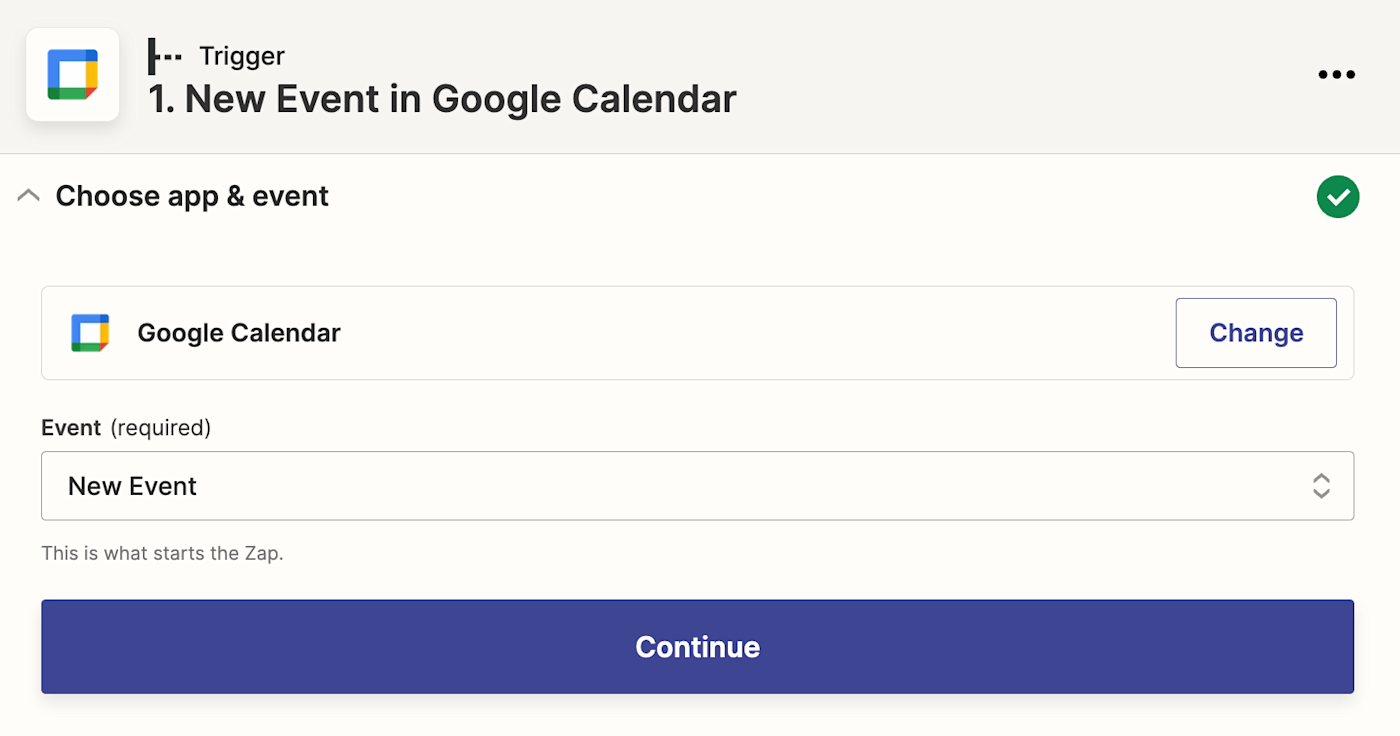
Select your trigger event and click Continue. We’re going to select New Event for our example.
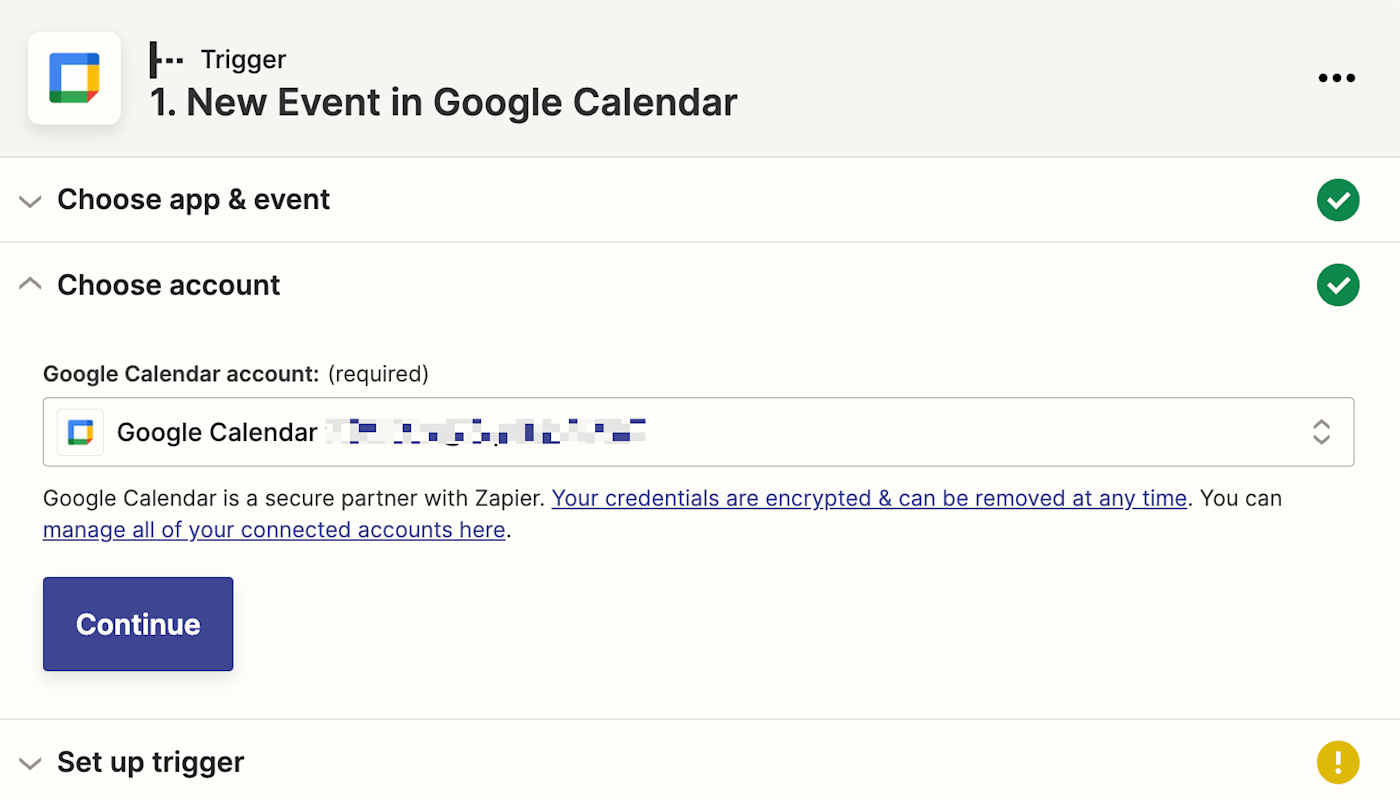
Next, connect your trigger app account to Zapier by clicking on the dropdown menu and selecting +Connect a new account. We’ll connect Google Calendar in our example. You’ll need to give Zapier permission to access your account. Once you’ve connected your account, select it from the dropdown menu and click Continue.
Next, set up your trigger step by filling in the trigger step fields. Depending on your trigger app and event, you’ll have different fields to customize. In our example, the only field we need to select is which Google calendar we’re going to integrate with.
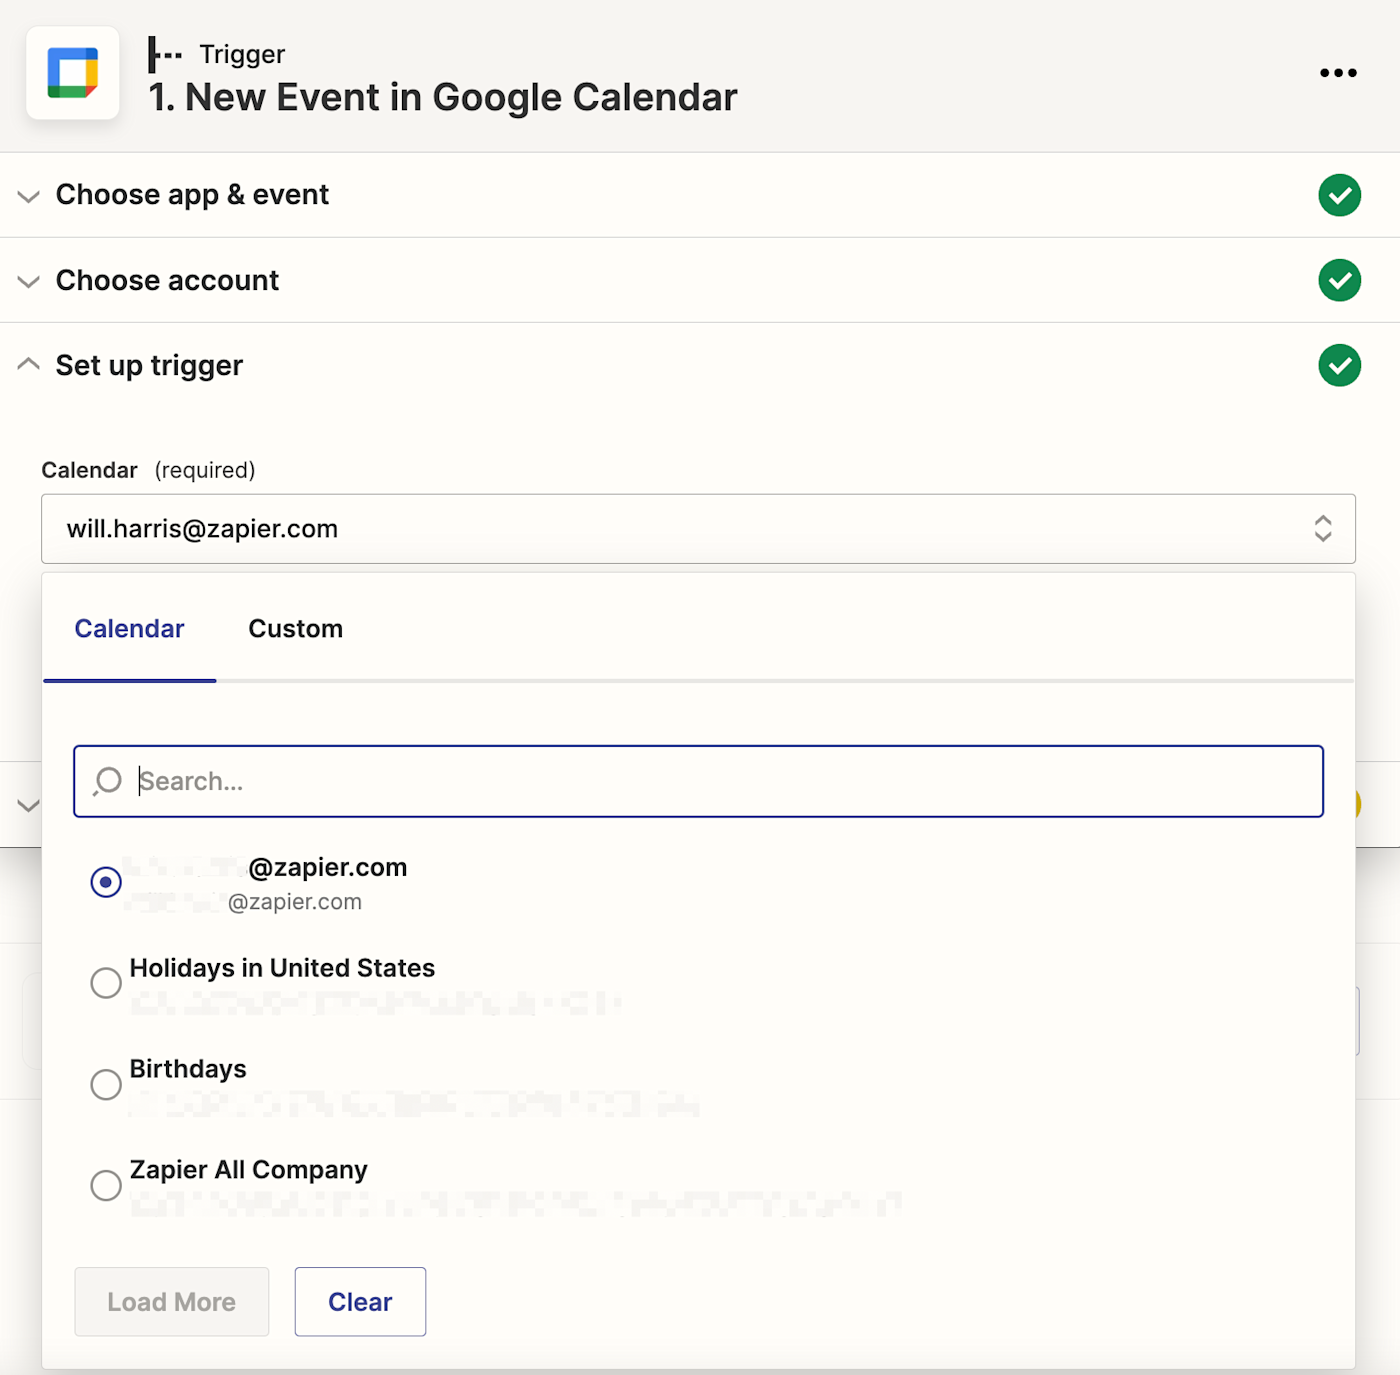
When you’re done customizing your trigger step, click Continue.
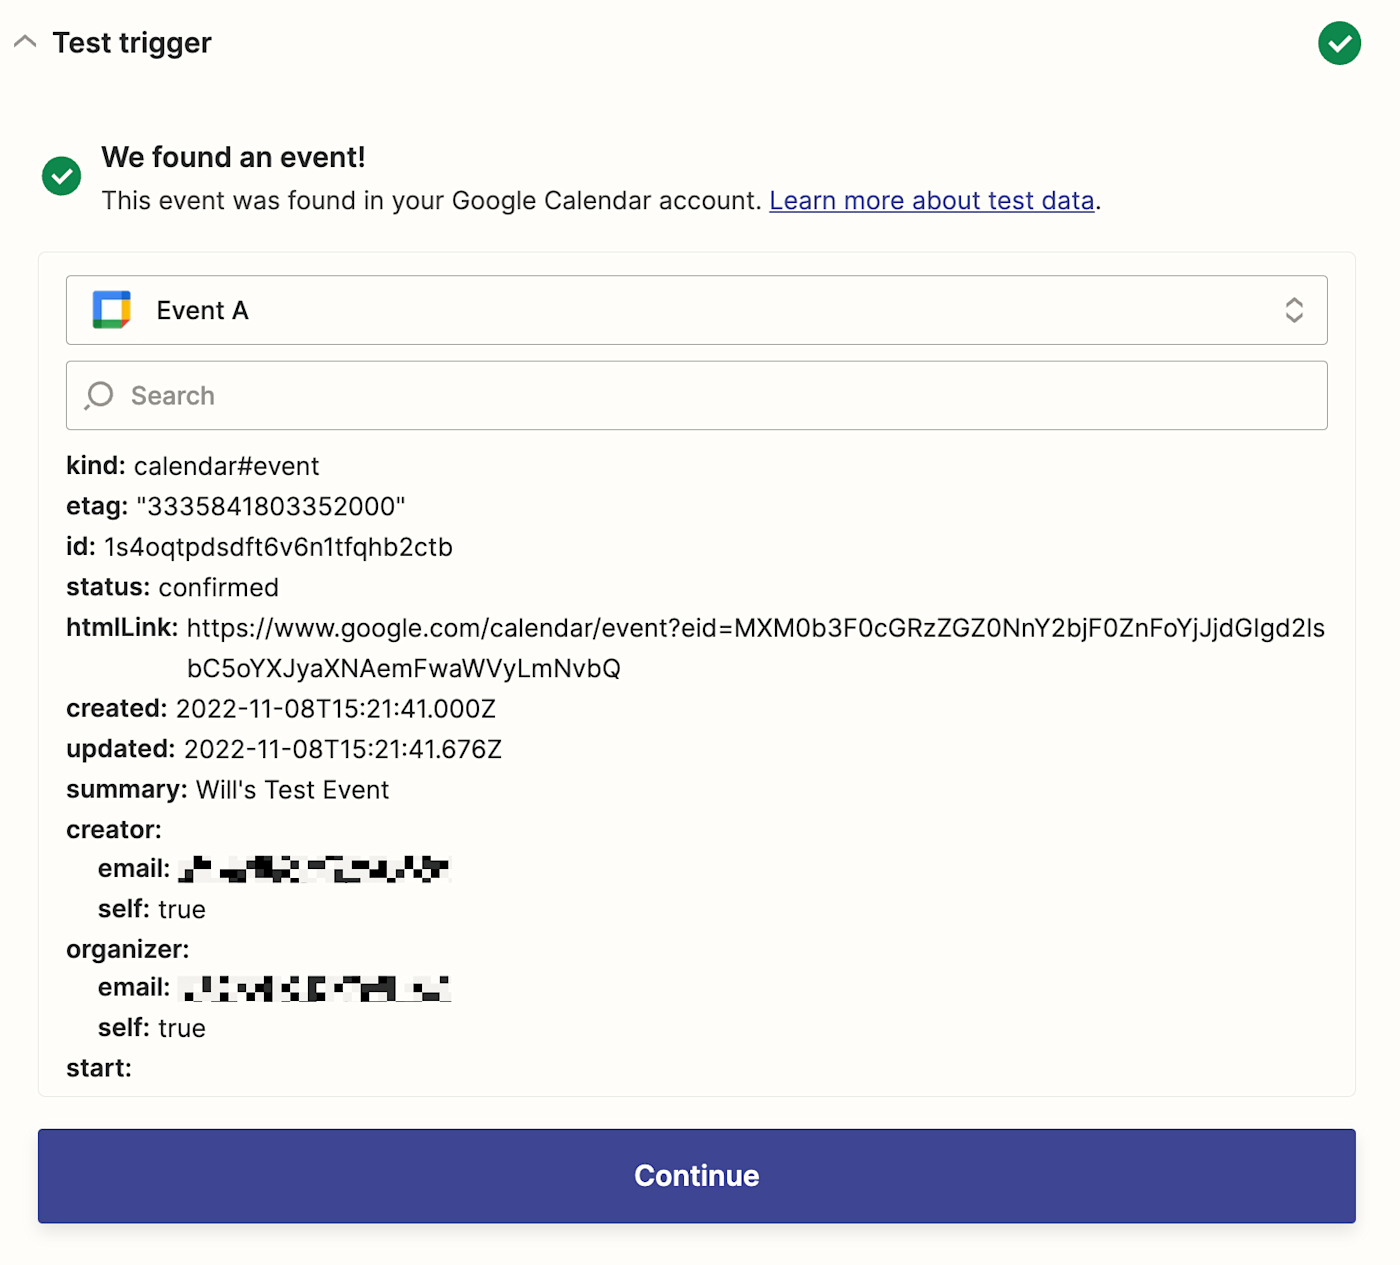
Next, click Test Trigger so Zapier will create a test event to make sure the trigger is working properly. Once the test runs successfully, click Continue.
Step 2: Connect your action app
In this next step, you’ll set up the action—the event your Zap will perform once it’s triggered. Start by searching for and selecting your action app. We’ll use Notion in our example.
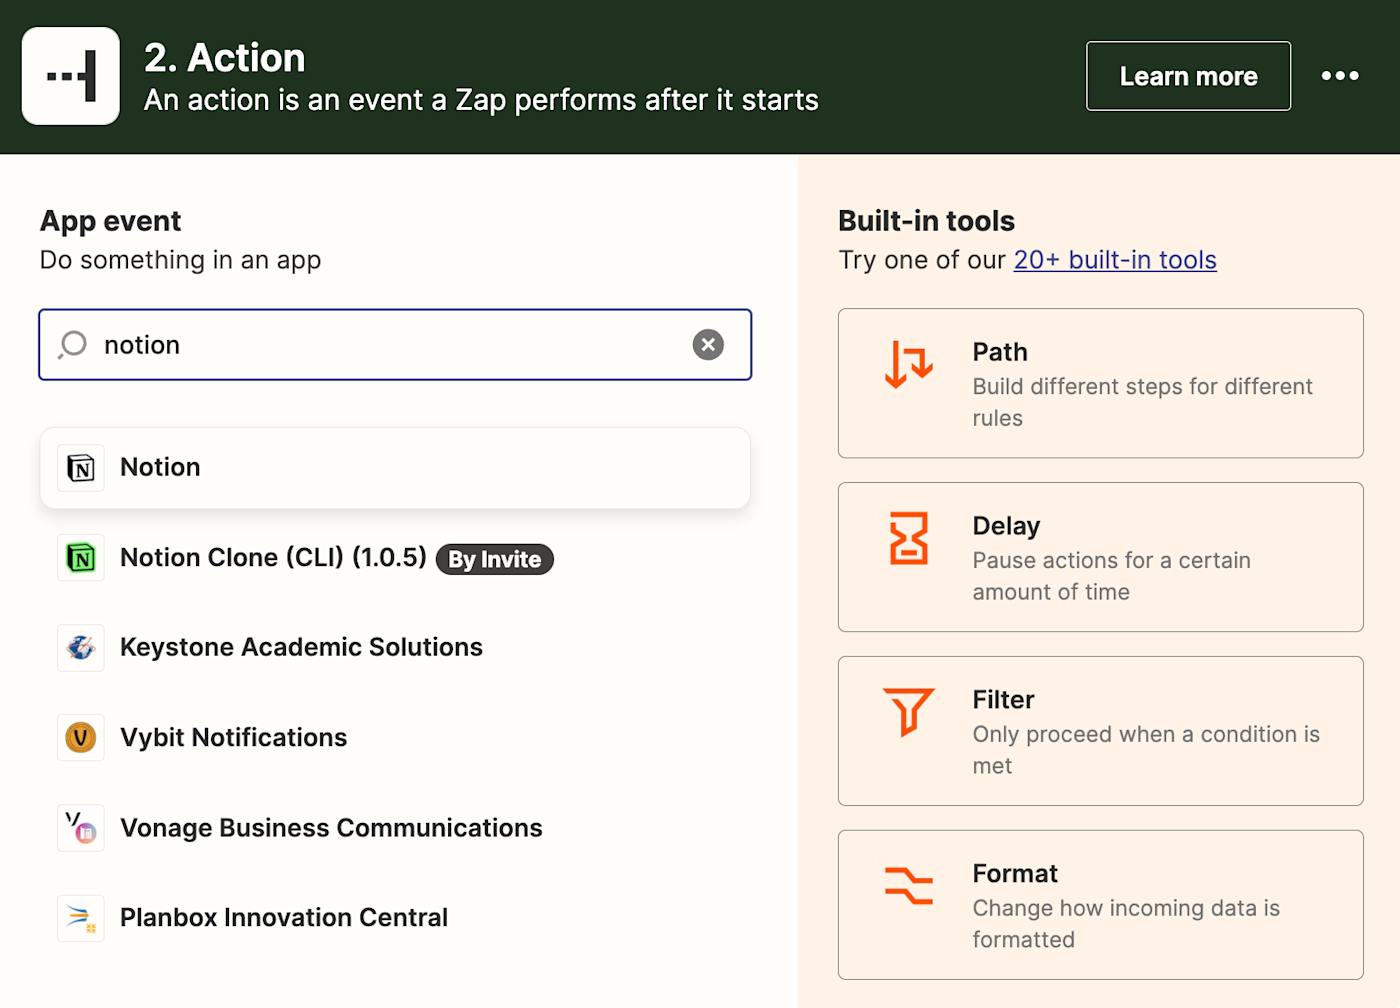
Next, choose your action event. If your action app is Notion, your Zap can create or update a database item, create a new page, or search for a page or database item.
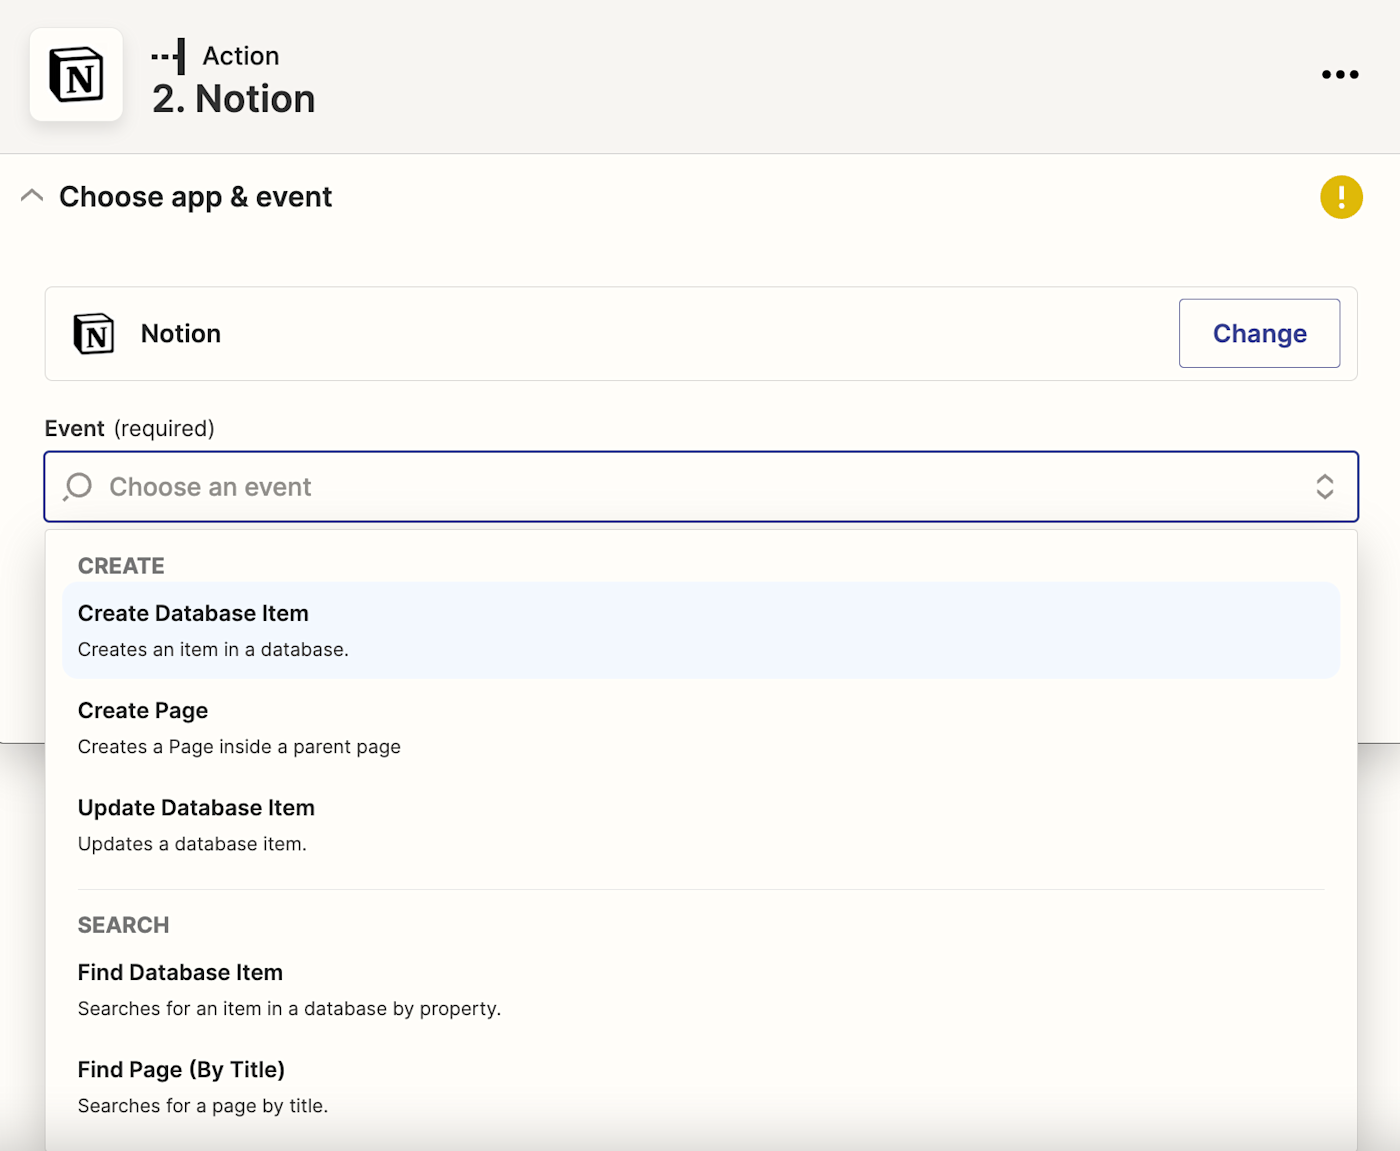
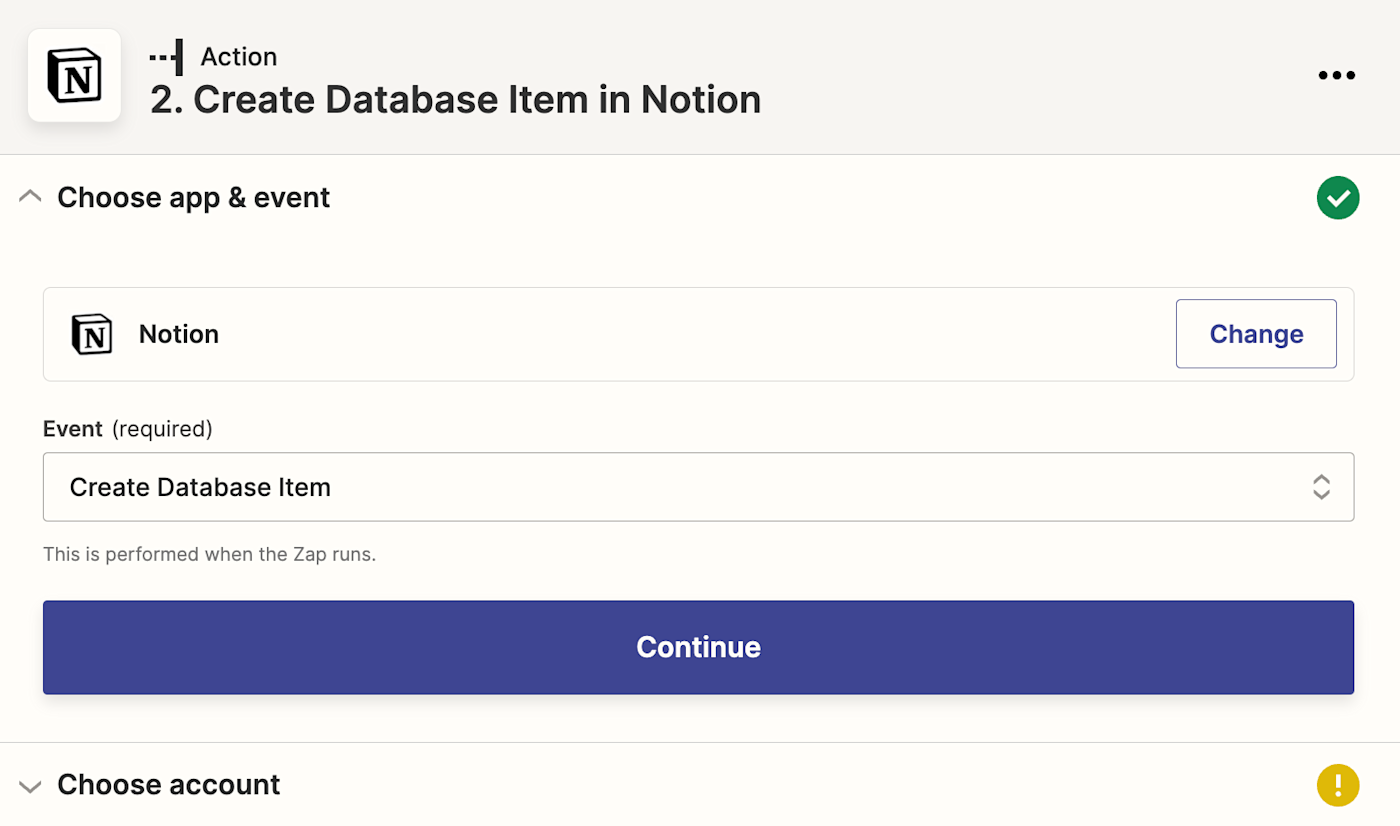
Select your action event and click Continue. We’re going to select Create Database Item for our example.
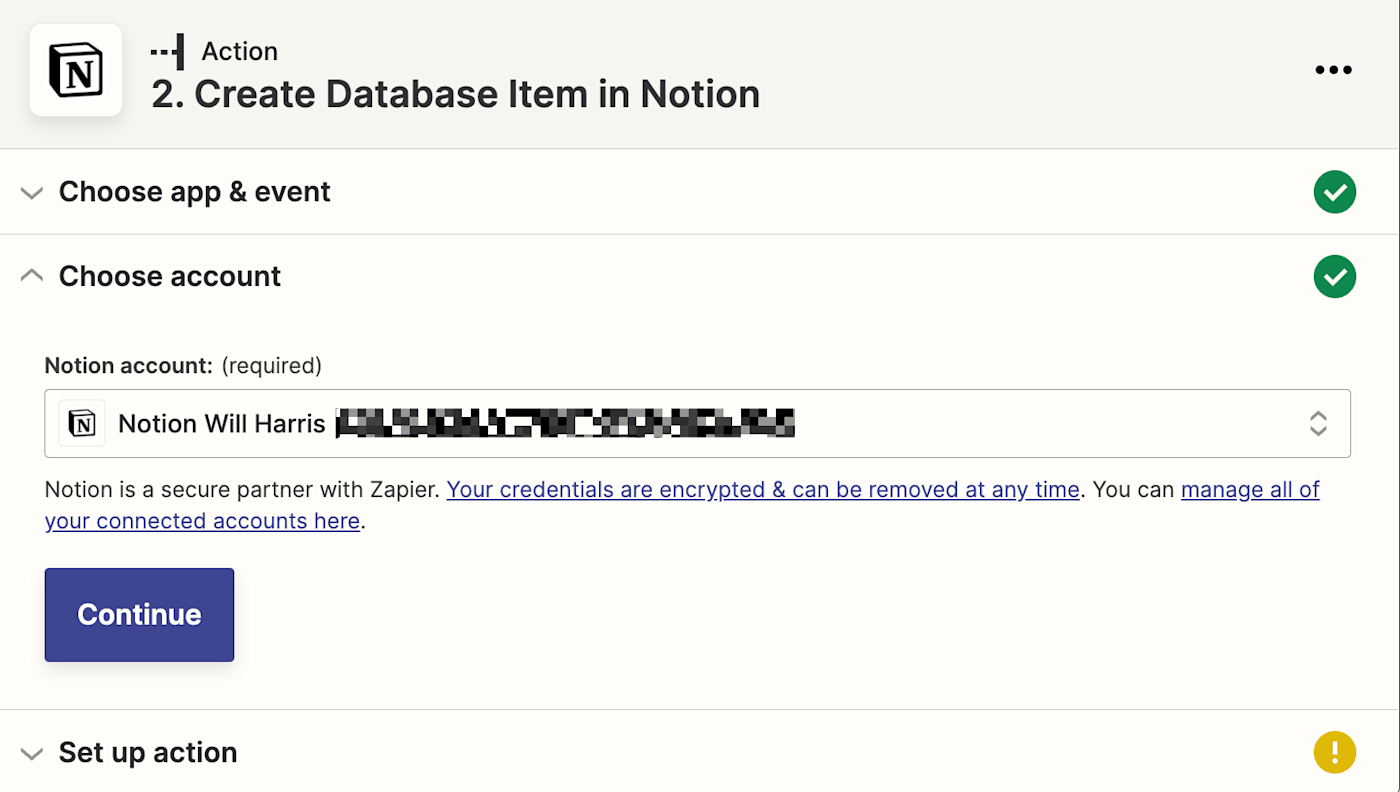
Next, connect your action app account to Zapier by clicking Sign in. In our example, we’ll connect Notion. You’ll need to give Zapier permission to access your app account. Once you’ve connected your account, select it from the dropdown menu and click Continue.
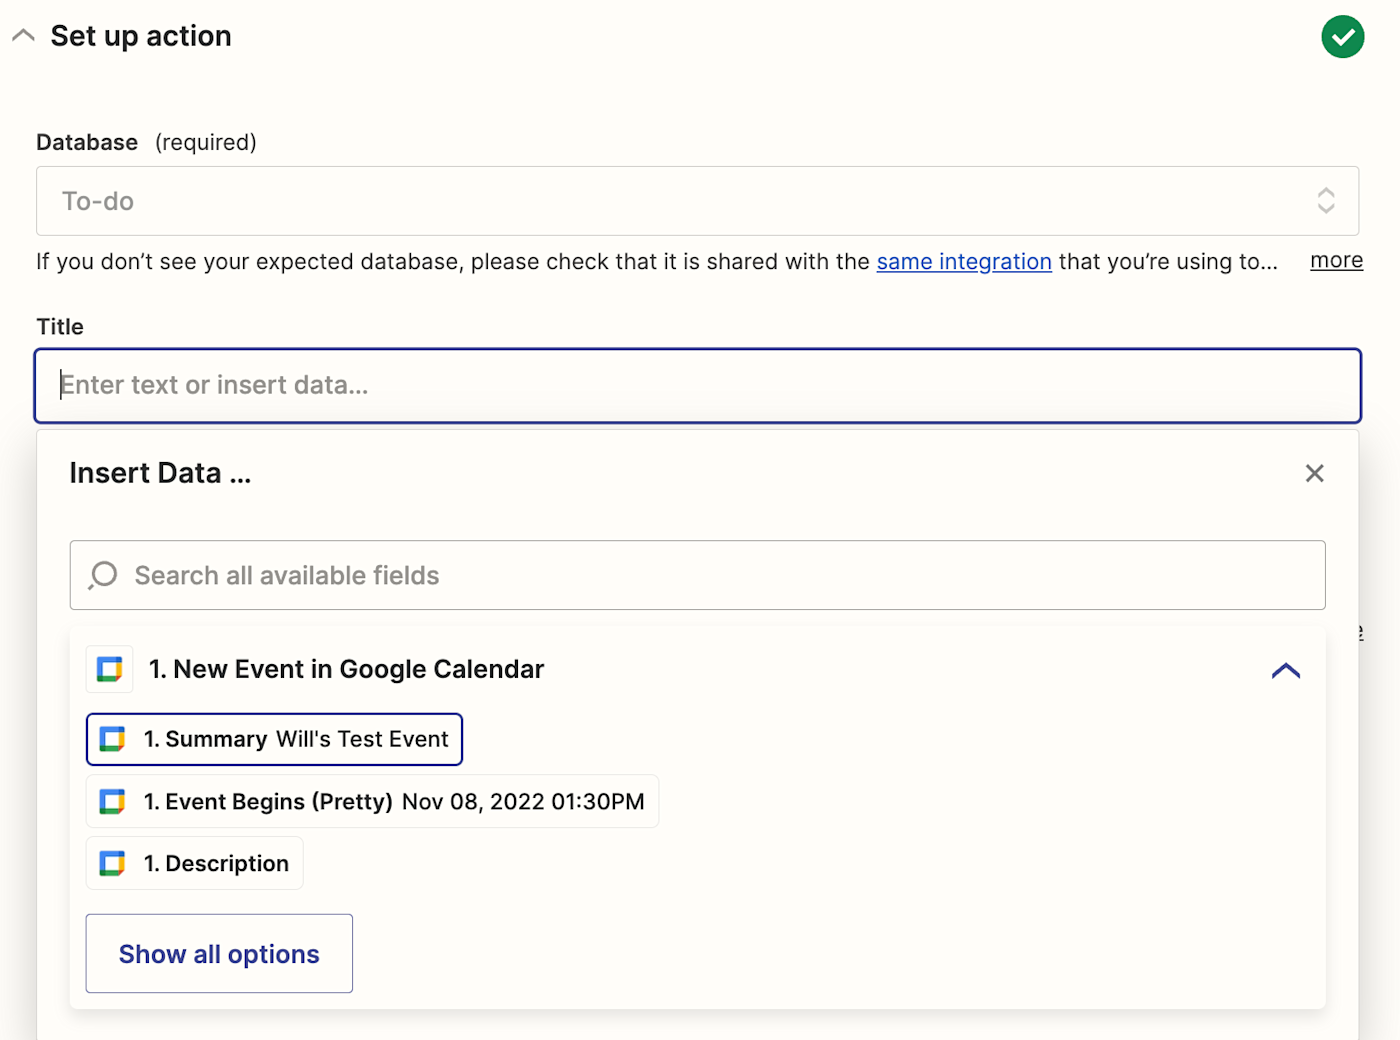
Next, set up your action by filling in the action step fields. Depending on your action app and event, you’ll have different fields to customize. In our example, the fields that show up in your Zap will be based on what fields you created in your Notion database.
You can also customize your action step with data from your trigger step. For example, to add data from your Google Calendar step—like the event summary—click in a field and select the data you’d like to use from the dropdown.
Once you’ve customized your action step how you’d like, click Continue.
Now it’s time to test your action. When you click Test & Review or Test & Continue, Zapier will send test data to your action app. In our example, Zapier will create a new database item in Notion according to how we set up the action step. We always recommend testing your Zap to check if your step looks ok. But if you’d rather skip the test, just click Skip Test in the bottom-right corner.
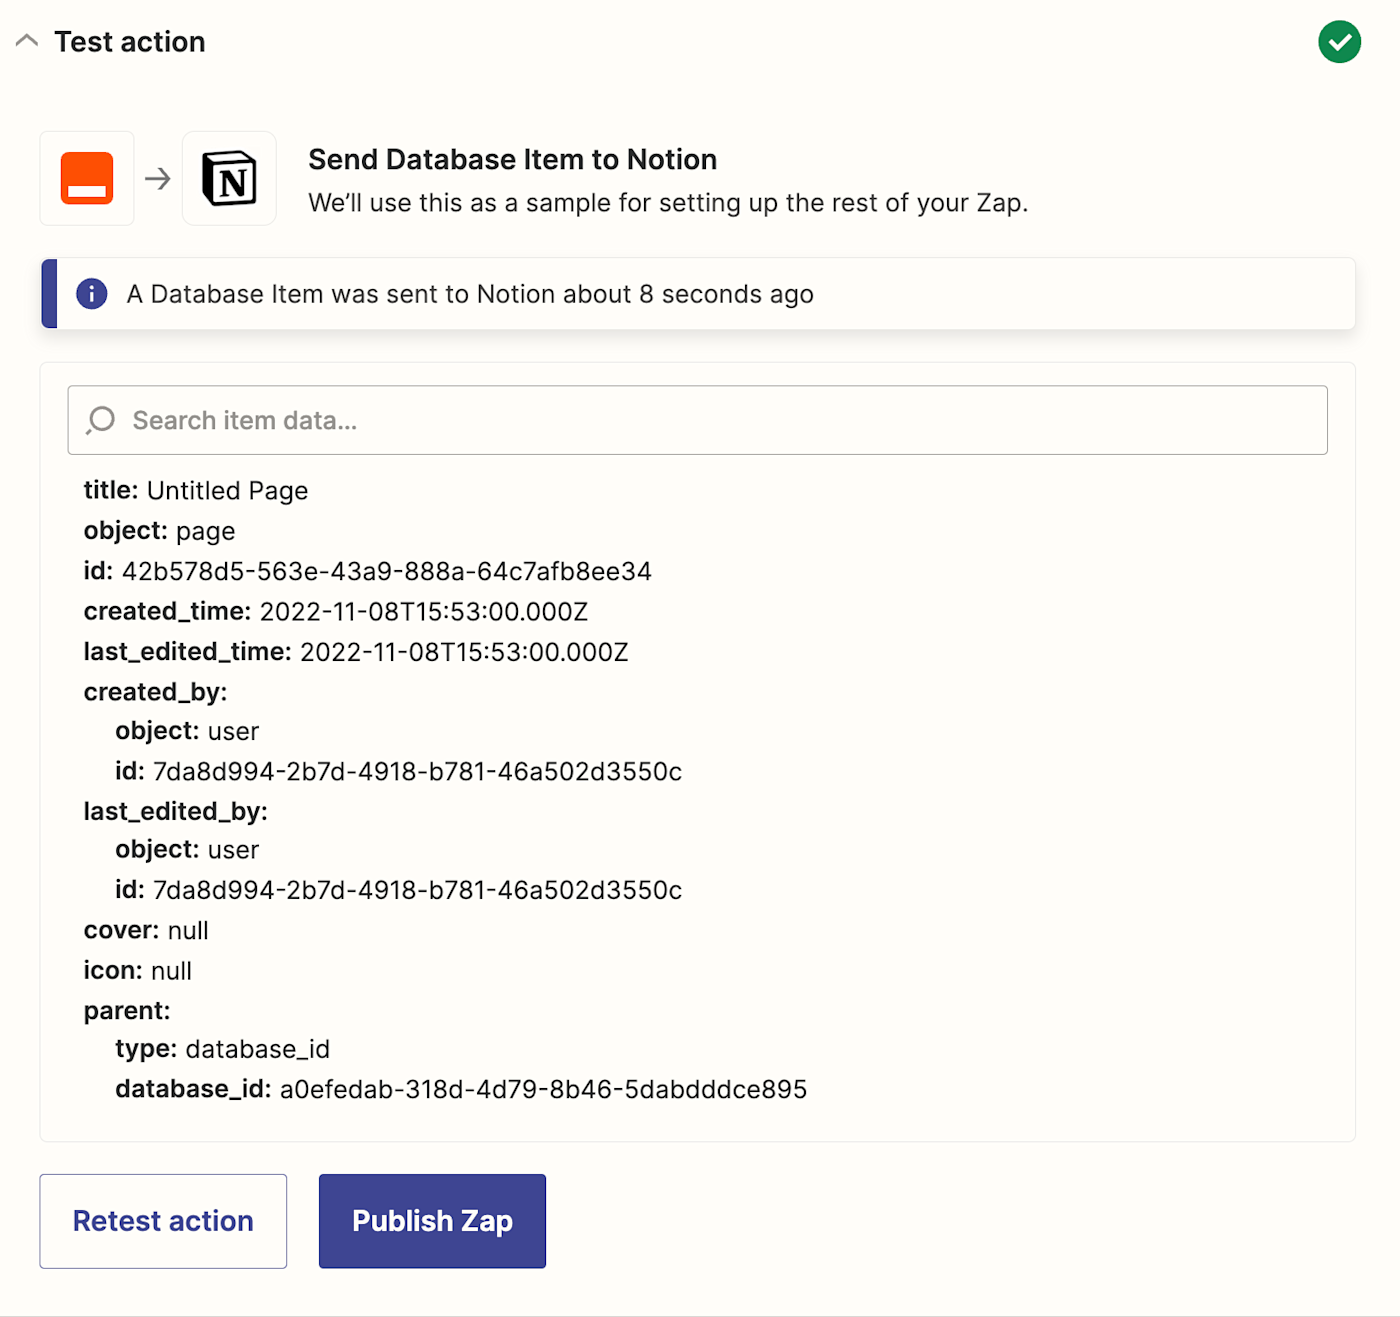
If your test looks right, you’re ready to use your Zap.
Method 3: Use Time Blocking Notion Template
Have you found a method for how you’d like to combine Notion and Google Calendar? If you haven’t or are still on the fence, I encourage you to try my Notion Time Blocking Template which comes with a free Zapier template for connecting calendars.
I get it. You’re probably thinking ugh, I really don’t want to have to sign up or pay for another app. Well, you won’t have to pay for anything. Unless you have more than 100 meetings a month, you’ll be able to use this integration to the fullest of its abilities!

Cheers!